6
SNAAAAAAKE!
The snake game, or Snaaaaaake, is a remake of a popular game that many people have played on their phones or calculators. You might know this game by another name—Nibbles or Worm. To play, you use the arrow keys to direct a constantly moving snake toward apples that appear on the screen.
The more apples the snake eats, the longer the snake gets and the harder it becomes to keep the snake from crashing into itself or the edges of the Stage. You can’t slow down the snake, and the game is over when the snake crashes.
Before you start coding, take a look at the final program at https://www.nostarch.com/scratchplayground/.
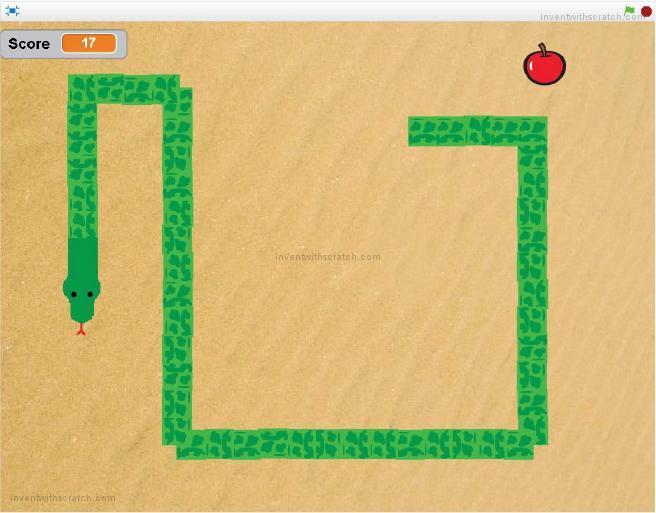
Even though the snake grows pretty long, you still have to measure it in inches, because snakes don’t have feet! (I make no apology for the corny snake jokes in this chapter; I think they’re hiss-terical.)
SKETCH OUT THE DESIGN
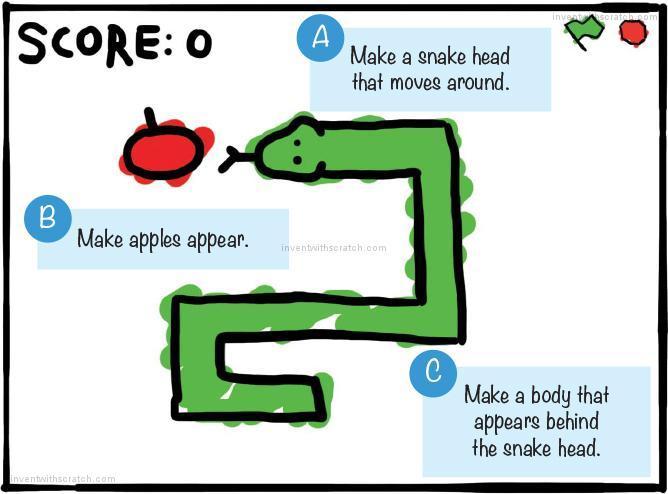
Let’s sketch what the game should look like.
If you want to save time, you can start from the skeleton project file, named snake-skeleton.sb2, in the resources ZIP file. Go to https://www.nostarch.com/scratchplayground/ and download the ZIP file to your computer by right-clicking the link and selecting Save link as or Save target as. Extract all the files from the ZIP file. The skeleton project file has all the sprites already loaded, so you’ll only need to drag the code blocks into each sprite.
|
MAKE A SNAKE HEAD THAT MOVES AROUND |
We’ll start by creating a snake head that the player can control with the keyboard. The arrow keys will change the snake head’s direction, but the snake’s head will always move forward. We’ll program the snake’s body later.
1. Create the Head Sprite
First, let’s make the background more interesting. Click the Stage in the Sprite List, and then click the Backdrops tab above the Blocks Area. Click the Upload backdrop from file button under New backdrop, and select sand.jpg from the resources ZIP file.

Next, draw the snake’s head. Click the Paint new sprite button next to New sprite. In the Paint Editor, draw a top-down view of a snake head that faces right. Since all Scratch sprites start facing 90 degrees (that is, to the right), you should draw the head facing right. After drawing it, rename the sprite Head.
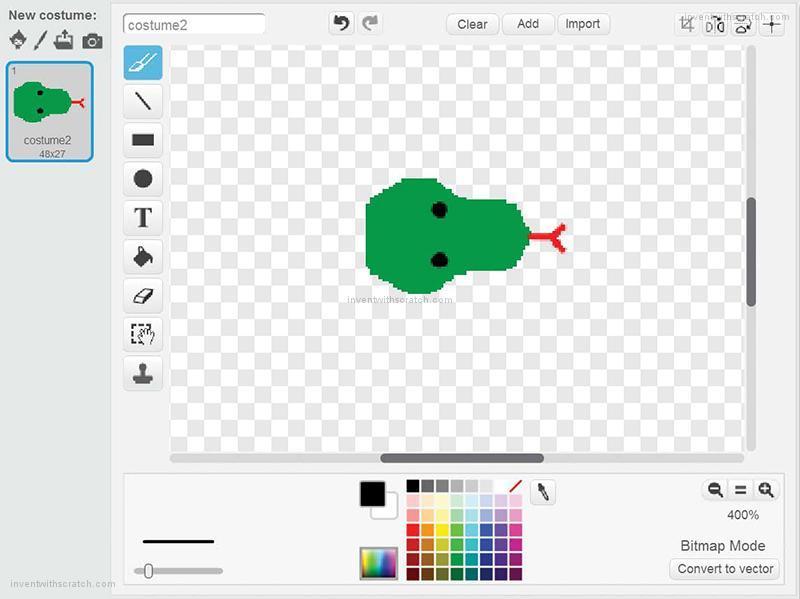
Use the Shrink tool or Grow tool at the top of the Scratch editor to shrink or grow your Head sprite. The Head sprite should be about as big as in the following picture.

Add this code to the Head sprite:

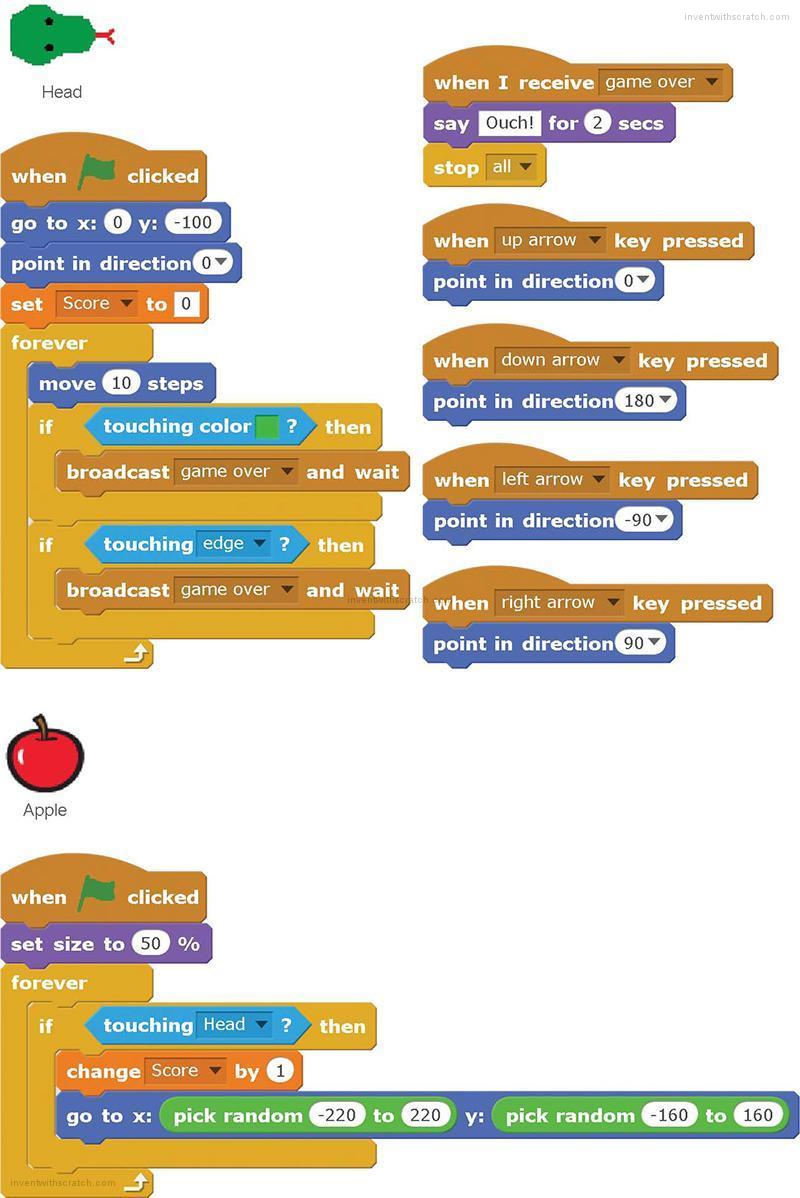
Script ➊ sets the starting position and the starting direction (0 degrees, or straight up) for the snake head. It sets the player’s score to 0, which will require you to create a For all sprites variable named Score. As in previous projects, you can create a variable by clicking the Make a Variable button in the orange Data category. Because we want the snake to never stop moving, program ➊ includes a forever move 10 steps loop.
Scripts ➋, ➌, ➍, and ➎ are short scripts that handle the player’s controls: the directions correspond to the up, down, left, and right arrow keys.
|
MAKE APPLES APPEAR |
The basics of moving the snake around are done, so let’s add the apple the snake will try to eat.
2. Add the Apple Sprite
Click the Choose sprite from library button next to New sprite, and select the Apple sprite from the Sprite Library. Add this code:
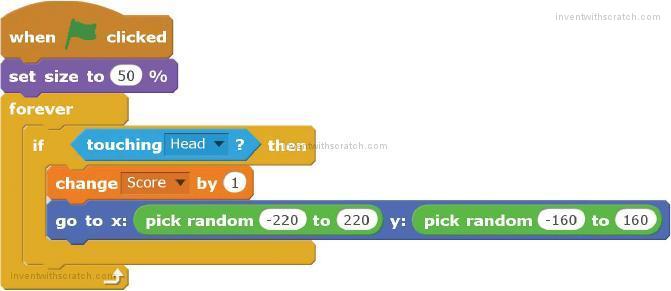
This code makes the Apple sprite disappear when the snake touches it and then reappear elsewhere on the Stage. The new position is picked from random numbers, like rolling dice. The script also adds 1 to the Score variable each time the Head sprite touches the Apple sprite.
|
MAKE A BODY THAT APPEARS BEHIND THE SNAKE HEAD |
Next, we’ll add the body of the snake, which we want to grow with each apple it eats.
3. Create the Body Sprite
Click the Paint new sprite button next to New sprite to create a new sprite. Draw a small square using the same color as the snake’s head. Make sure the costume center is in the middle of the square by clicking the Set costume center button and then clicking the middle of the square.

Click the sprite’s i button to open its Info Area, and rename the sprite Body.
4. Create the Body Sprite’s Second Costume
While you’re still in the Paint Editor, right-click the costume1 costume, and select duplicate from the menu. Using the Fill tool, change the color of the square to a different color, such as a light green. (My program uses dark green for the snake’s head and a lighter green for the body’s second costume.) We’ll use the light green color to detect whether the snake has crashed into itself. You can also add some patterns on top of this color.
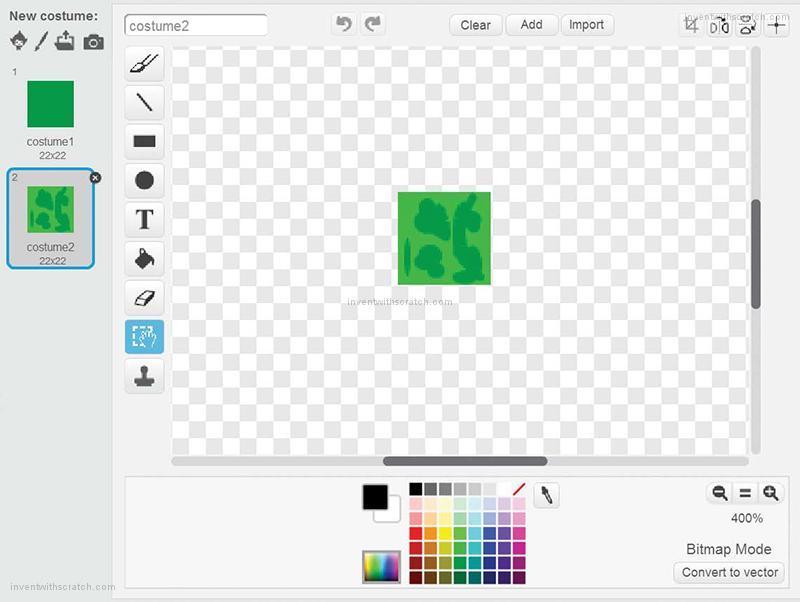
You can draw clothes on the snake’s body if you want. I’d recommend a boa-tie, a feather boa, or some Nike snake-ers. Or you can leave it s-naked. (Will these snake puns ever end? Don’t asp me!)
Just make sure the Body costumes are square and that costume2 uses a different color than costume1 and the Head sprite!
5. Add the Code for the Body Sprite
Click the Scripts tab, and add the following code to the Body sprite. We want the Body sprite to always follow the Head sprite and generate clones of itself.

The original Body sprite code runs under the when green flag clicked block in script ➊. As the Head sprite moves around the Stage, the Body sprite creates a trail of Body clones in its path.
The Body clones code runs under when I start as a clone in script ➋. When the Body clone is first created, it points in a random direction. The pick random 0 to 3 * 90 block makes the Body clone face 0, 90, 180, or 270 degrees. This rotation makes the body segments look slightly different.
The clones eventually need to delete themselves from the Stage so that the snake doesn’t just keep growing longer. So each clone waits for a short time based on the Score variable in the wait Score / 5 secs block before deleting itself. Every clone waits this amount of time, so the first Body clones made are the first Body clones deleted.
Eating apples increases the Score variable. As the Score variable increases, the amount of time a Body clone waits before deleting itself also increases. This longer wait makes the snake look longer, because more Body clones remain on the Stage. So the more apples the snake eats, the longer the snake gets.
When Score is set to 0, the wait is 0/5 seconds, or 0 seconds. When Score is set to 1, the wait is 1/5, or 0.2 seconds. When Score is 2, the wait is 2/5, or 0.4 seconds. Each point added to Score adds another 0.2 seconds of wait time, resulting in a longer and longer snake. As the snake gets longer, the difficulty of the game really scales up!
6. Detect Whether the Snake Crashes into Itself or a Wall
When the snake crashes into itself or the edges of the Stage, we want to run the when I receive game over code: the Head sprite will say “Ouch!” for 2 seconds and then stop the program. Instead of writing the same code twice, let’s put the code for all crashes under a when I receive game over block so that either crash can broadcast game over and run this code. If you want to change the code, you just need to change it in one place—in the when I receive game over script.
Add the following code to the Head sprite:
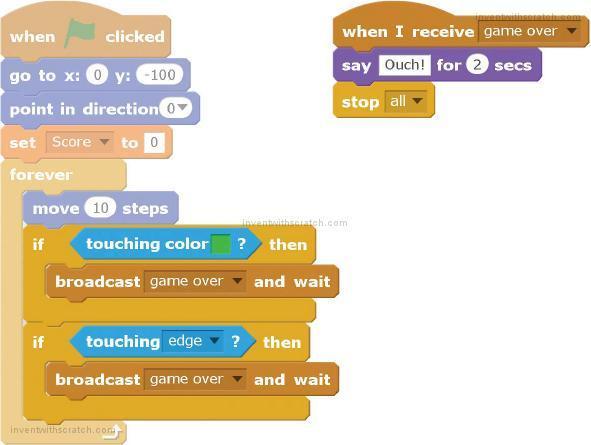
Using the touching color? block, the first if loop tests for the condition when the snake touches its own body: make sure you use the color you used in costume2 for this condition. The next two if statements test the horizontal and vertical boundaries of the Stage. When the snake crosses them, the same game over broadcast is sent. Let’s hope the player is quick enough to avoid crashing; otherwise, that snake is hiss-tory!
Did you notice the wait 0.01 secs block in the Body sprite that makes the Body clones wait a bit before changing costumes? Here’s the code for the Body sprite again:

The second costume for the Body sprite has the lighter color that the Head sprite uses to detect if the snake has crashed into itself. Because the Body clones are created at the same place as the Head sprite, they are touching the Head when they first appear. This is why we want to pause the crash detection when the clone is created. Without this pause, the Head sprite would think it crashed into the Body clone that was just created because it was touching the lighter color.
THE COMPLETE PROGRAM
The final code for the entire program is shown here. If your program isn’t working correctly, check it against this code.

VERSION 2.0: ADD BONUS FRUIT
Just having one type of goal in a game can get boring after a while. Let’s add some bonus fruit!
Let’s add a second type of fruit that will increase the score by 3 points when the snake eats it. Click the Choose sprite from library button. From the Sprite Library window, select Fruit Platter and click OK. (Or maybe choose a dessert instead if your snake is a pie-thon.)

Add this code to the new sprite:
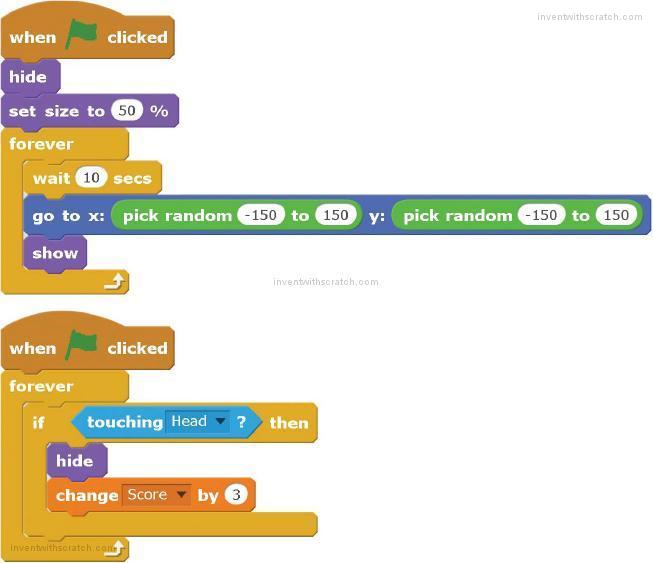
The Fruit Platter sprite’s code is almost identical to the Apple sprite’s code except it has a 10-second pause before reappearing somewhere else on the Stage after the snake touches it. With these bonus points, the snake’s score will really adder up!
CHEAT MODE: INVINCIBILITY
It would be fun to make the snake very, very long! Let’s add a cheat mode so the snake can keep growing without crashing into itself. We’ll also add a rainbow effect to the snake so that the player can see when cheat mode is enabled.
Modify the Head
Modify the Head sprite’s code to match the following. You’re adding to the script you wrote earlier and adding a whole new script, too. Both will require you to make a new variable named cheat mode. Make this variable For all sprites.

Script ➋ controls how the cheat mode works. Pressing the spacebar toggles the cheat mode variable between on and off. When set to on, the game over message will not be broadcast, even if the Head is touching the lighter color. The reason is that, in script ➊, you’ve added and cheat mode = off to the if then block that checks whether the snake has crashed into itself.
If cheat mode is set to on, it doesn’t matter if the snake has crashed into itself, because both touching color? and cheat mode = off must be true before broadcast game over and wait runs.

Script ➊ also has an if then else block that will give the Head a rainbow effect when the cheat mode is enabled. When the cheat is not enabled, the color effect is reset to 0, which makes the sprite revert to its original color.
Modify the Body Code
Now we want to add this rainbow effect to the Body clones. Modify the Body sprite’s code to match this:

When the cheat mode variable is set to on, the Body sprite will gradually change its color effect to produce a rainbow. Otherwise, the Body sprite sets its color effect to 0.
CHEAT MODE: CHOP OFF YOUR TAIL!
The game is no longer a challenge if the snake is invincible. But it would be convenient if you could temporarily get rid of the snake’s body if you’re about to crash into it. Let’s add a cheat that will instantly remove the body.
Add this code to the Body sprite:

When the player presses the C key, all the clones will delete themselves. (Nothing happens to the original sprite because it is not a clone.)
SUMMARY
In this chapter, you built a game that
 Uses a sprite to generate a trail of clones as it moves around the Stage
 Uses a snake head and body costumes that you drew in the Paint Editor
 Detects when the snake head touches the body by checking whether the head is touching the colors on the body
 Uses a variable to track when a cheat mode is turned on or off
 Lets the player control the direction of the snake with the keyboard but not the speed
 Has no end goal; the player continues playing as long as possible
The Snaaaaaake game’s keyboard controls are similar to those of the Maze Runner game in Chapter 3. The player has a top-down view and moves up, down, left, and right. However, the Snaaaaaake game is different because the player’s character is always moving. The player can control only the direction. You can use this style of movement in fast-paced games of your own design.
In Chapter 7, you’ll learn how to use the mouse in your programs by creating a clone of the Fruit Ninja game. Then your programs will be able to use a keyboard, a mouse, or both!

